Binreader Usenet Client for Windows, Mac, Linux

We recently had the opportunity to test a new NZB downloader.  The Binreader Usenet client is currently in beta.  The new reader is free and available for Windows, Mac and Linux with an Android version coming soon.  The beta is currently available to download at http://www.binreader.com/

We took particular interest in the portable version of Binreader.  It is a Windows download that requires no installation.  Simply load the files on thumbdrive and run it from anywhere, very cool!  In addition the Binreader NZB client is available for Windows, Mac OS X (requires mplayer for streaming downloads), and Ubuntu / Kubuntu / Debian Linux versions.  With an Android newsreader in the works.

Their are a few key features that help Binreader stand out.  First in the simplicity of using the client.  We’ll demonstrate in a moment but it is the easiest newsreader we’ve used in quite a while.  It has one simple purpose.  Download and stream NZB files.  A function it performs very well.

Binreader includes some premium newsreader features.  Especially considering it is free.  First the client let’s you stream content while downloading.  It also extracts RAR files and does PAR repair automatically.  Even better it will pause the PAR files and only download them if necessary.  Now let’s take a look at the reader.

The first step is to download Binreader.  In our case we chose the Windows portable version and loaded it on thumbdrive.  No install, just pure Usenet goodness.
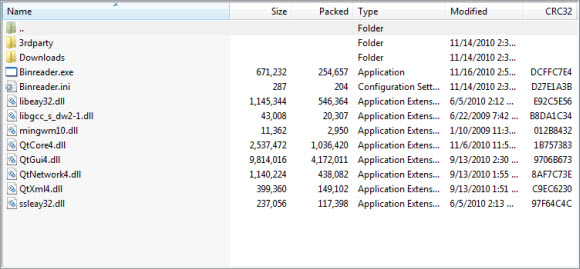
Next we copied the files to portable media and ran the Binreader executable to launch the client.  No installation required.
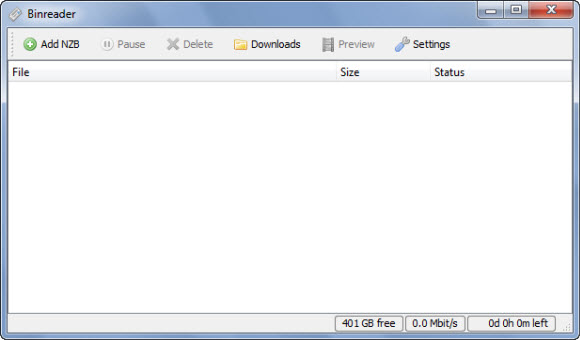

Before downloading the first time you will want to set the news server and account information for connecting to your Usenet provider.  Click the “Settings” button up top to get started.
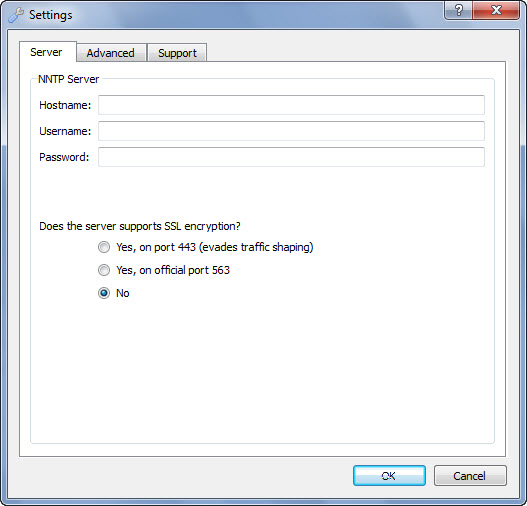
Here you can set your news server, account and SSL settings.  We quickly entered our news server along with username and password.  Then came down and chose to run SSL via port 443.  Next you will want to click on the “Advanced” tab.
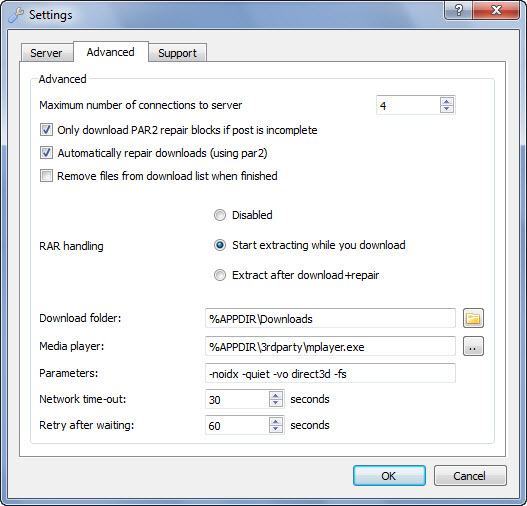
The first setting you will want to review is the maximum number of connections.  Binreader defaults to 4 but you can set it up to 50.  Tip: only use the minimum number of connections necessary to achieve your desired speed.  Any more wastes resources.  The next setting is great “Only download PAR2 repair blocks if post is incomplete“.  It is checked by default and will save you from downloading PAR files unless necessary.  The second option “Automatically repair downloads (using PAR2)” is equally important.  Let Binreader do the work for you.  While the third option isn’t checked by default the client will remove the files from the download list when finished if you like.  If not they are easy to clean up.

We left the RAR handling set to the default “Start extracting while you download”.  The download folder is important.  Especially if you decide to run Binreader off a thumbdrive like we did.  By default content is held in a downloads folder under the Binreader app folder.  This is easy to change.  For those using the reader in a normal setting the default is convenient.  We did not modify any of the other settings.  Now it was time to test some newsgroup downloads.  First we had to find a good NZB file for testing.  We headed over to NZB.cc to find a Ubuntu NZB.
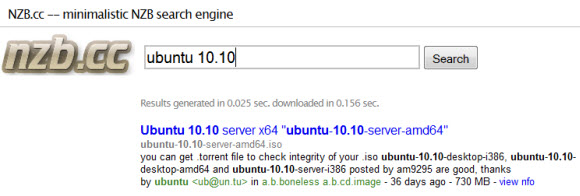
After finding a good Ubuntu NZB we downloaded the file and went back to Binreader.  Clicking “Add NZB” and selecting the NZB file will automatically queue and start the download as shown below.
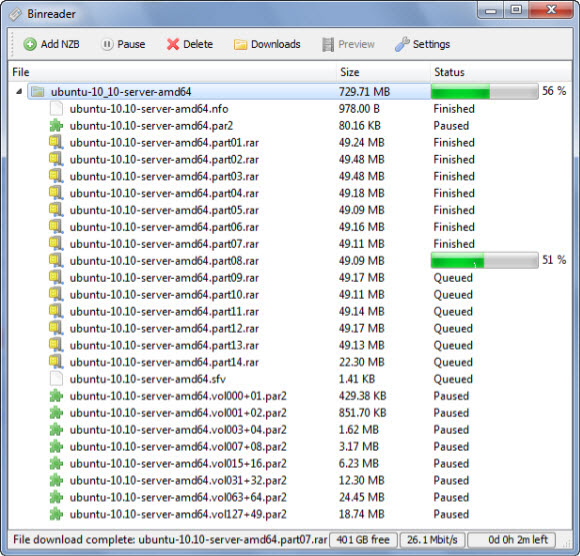

As you can see in the image the download immediately started and the PAR2 files are paused.  They are only downloaded if necessary to repair the archive.  In our case Unbuntu downloaded and was automatically extracted without any need for repair.

After the download is completed you can simply click the “Downloads” button at the top of the Binreader interface and find your content.  One other note, when deleting downloads from within the Binreader interface it will ask whether you want to delete just the entry or the associated files.  Make sure to click “No” if you only want the entries deleted.  The message is clear but we wouldn’t want anyone accidentally deleting their downloaded content.

Well that wraps up our review or Binreader.  We enjoyed the Usenet client and look forward to using the portable version while on travel.  Definitely download a free copy of Binreader and enjoy!

Backdoor Access to Newzleech.com via Hidden URL

November 17th update:  Access to the site is completely down now.  No response via the home page or other URL’s.  It looks like Newzleech is gone for good.

Yesterday we discussed how the Newzleech.com site was down and gave readers some Newzleech alternatives.  A few minutes ago we got an anonymous tip that Newzleech is accessible again via a backdoor page.

We have no idea whether or not the hidden URL is intentional or simply left over from previous testing.  Either way if you would like to access Newzleech for now you can do so using this address:

http://www.newzleech.com/index2.php

Please take caution when accessing Newzleech via this link.  The search engine UI and results appear to be valid but you never know since we’re still not sure why the Newzleech home page reads – Newzleech is no more.

Newzleech.com Down : Newzleech is No More

We had a surprise this morning.  One of those you wish you didn’t get.  Visiting Newzleech.com displayed a short message:

Newzleech is no more 🙁

Newzleech was a popular Usenet search engine with free access to over 600 days of binaries and a simply interface for finding and downloading NZB files.  While there are solid alternatives we will miss Newzleech and wish the site creators the best of luck in future endeavors.  We have no idea why the site shut down but it appears sudden as no one we talked to knew anything was coming.

For those who are looking for Newzleech alternatives you might consider these sites: Binsearch, NZB.cc, NGIndex, NZBsRus and NZBIndex.  For more options visit our Usenet search section and compare NZB sites.

Mimo Usenet Guide Part 3 : Tips, Tricks & Shortcuts

Welcome to the third and final installment of our Mimo Usenet Guide.  In Part 1 we discussed how to install Mimo.  In part 2 we covered the top 10 Mimo newsreader features.  Now in part 3 we’re going to share some tips, tricks and shortcuts to help make your Mimo experience even more enjoyable.

We found a few shortcuts and keystrokes helpful in navigating and using Mimo newsreader rev. 0.1.9 and would like to share them.  We’ll keep the post updated with new tips so please send us any you might come across – feedback (at) newsgroupreviews.com.

Giganews Newsgroups

Mimo Tips and Tricks

1. Run Mimo in full screen mode

I know this one is simple but it helped so much.  When we first tested Mimo it felt like something was missing.  Mainly from a UI perspective.  Just like any new reader we had to figure our way around.  Finally someone said “Hey, we’re not running in full screen mode”.  Doing so made all the difference.

Running Mimo in full screen mode gave us access to the Mimo Taskbar.  Similar to the Windows taskbar it gives you access to important features and stats.  You can easily bring up Downloads, Group List or New Conversation (post to a text group).  Then on the right side you can see the current download speed along with recognition that SSL encryption and Giganews Accelerator are enabled.

2. Get to know the Usenet search filters

When you first open Mimo the “Search” tab is blank for the most part.  You can choose whether to search via Golden Frog, NZBIndex.nl or Find a Newsgroup.  However, you can’t set any search filters yet.

First do a simple search.  In our case we searched for “Ubuntu” which brought back lots of results along with filtering options to help narrow things down.  First you have the option to hide messages, images or files from the result pane.  You can also set a filter on the min/max file size in MB or GB and the max age in days.  All of which can be very helpful in narrowing the search results.

3. Get to know the Download screen

This isn’t a how-to-use Mimo tutorial so we’re not going step by step through using Mimo.  We’ll leave that Golden Frog or Giganews.  Rather we thought the download screen features were worth sharing and also had a couple comments to share for enhancing this area of Mimo.

The download screen is accessible via the Mimo taskbar at the bottom or the View menu or by pressing Ctrl + D.  Here you will see anything in your queue along with other files that have downloaded and any failures.  To clean out completed downloads simply right click and choose “Clear inactive downloads“.  If you want to open the files right click and choose “Show in Folder“.  A nice feature.  Remember Mimo automatically takes care of the RAR assembly and PAR recovery process (assuming PAR files were available).

If you queue up several downloads you’ll notice they all run at once.  It would be great to have the option to prioritize downloads.  In the meantime though you can pause and restart downloads.  We found the word “restart” confusing at first.  After downloading 50% the last thing we wanted to do was start over.  In this case though ‘restart” actually meant “start where the download was paused”.  We would have preferred the word “Resume download” but the outcome is the same.

4. Configuring Mimo server settings

There are a number of configurable settings in Mimo.  First of which are the server settings.  You can access them by clicking Tools – Server Settings or pressing Ctlr + Alt + S.

The first thing you will see on the server settings page are port settings.  All traffic through Mimo is SSL encrypted.  By default the browser uses port 563.  If your ISP happens to throttle that port you can change it to port 443.

The next option is maximum connections.  The default is set to 10.  As a Diamond member you can use up to 50 simultaneous connections.  For the best performance choose the minimum number of connections required to max your Internet connection or achieve your desired speed.  It can take a few tries to find the sweet spot but it’s worth it as running too many connections will tie up your system resources.

On the opposite end of maxing your speed through increasing connections you have the option to throttle bandwidth.  This can come in handy.  Especially if you share your Internet connection with others who would appreciate some bandwidth while you download.  Remember Giganews network is very fast so if you don’t want it maxing your line then configure this option.

5. Configuring Mimo download settings

There are also a few configurable settings for how Mimo treats your downloads.  You can access them by clicking Tools – Download Settings or pressing Ctlr + Alt + D.

The Target Directory and Spool Directory are set by default but you can change them to any folder you desire.  When files are downloaded Mimo will create subfolders based on the newsgroups.  We’re use to this approach and find it helpful in organizing downloads.

Next you have some options for automating Rar, Par and file clean up.  First is “Recover the files after download if possible“.  Set by default Mimo will use any Par files to repair damaged archives as necessary.  The second options is “Automatically unpackage RAR files“.  No more need for WinRAR or another third party utility to unRAR your downloads.  The last option is “Delete individual RAR archive parts after successful assembly“.  We chose to let Mimo take care of this as well.  Nice to keep downloads organized and more free disk space.

Now we’d like to share our Mimo shortcuts cheat sheet with you.  All the shortcuts are visible in the Mimo menu’s but we find it easier to have a sheet for reference since keystrokes are always faster than multiple clicks.  Feel free to use the list below or download a PDF of the Mimo Shortcuts cheat sheet from NGR.

Keyboard shortcuts for Mimo Usenet Browser

File Shortcuts:

Ctrl+T – New Search Tab
Ctrl+O – Open NZB File
Ctrl+Q – Exit Mimo

View Shortcuts:

Ctrl+L – Group List
Ctrl+D – Downloads
Ctrl+Shift+J – Status Console
Ctrl+W – Close Current Tab
Ctrl++ – Increase Font Size
Ctrl+- – Decrease Font Size
Ctrl+0 – Reset Font Size

Tools Shortcuts:

Crtl+N – New Usenet Message
Ctrl+Alt+S – Server Settings
Ctrl+Alt+D – Download Settings
Ctrl+Alt+I – Identity Settings
Ctrl+Alt+B – Block List Settings
Ctrl+Shift+Del – Clear Download List

That’s a wrap.  We hope you’ve enjoyed our Mimo Usenet Guide series and will become a regular visitor to NewsgroupReviews.com where we cover the entire Usenet industry including reviews, tutorials, free trials and special offers.  If you’re not already a Giganews Diamond member sign up now and receive a 14 day free trial and 50% off your first month!

Mimo Usenet Guide Part 2 : Mimo’s Top 10 Features

In part one of our Mimo Usenet Guide we discussed how to install the Usenet browser.  Now in part two we’re going to cover Mimo’s top 10 features.  What really makes the Mimo newsreader shine!

All newsreaders have their good qualities and opportunities for improvement.  These two categories can intersect as well since we all have our own preferences in how we browse newsgroups and download binaries from Usenet.  We preface the list with that comment because our “Top 10” might not be the same as yours.  Please share your thoughts with us as we continue to learn about the new browser.

Unlike most “Top 10 Lists” we’re not going to count down from 10 to 1.  No need to keep anyone waiting.  We’ll cover what we think is the coolest feature right from the start and go into detail for each feature on the list.

Giganews Newsgroups

Top 10 Mimo Newsreader Features

1. Built-in Usenet search engine

The Mimo browser includes two built-in Usenet search engines.  You can choose from the default Golden Frog engine or NZBIndex.nl engine.  We’re crossing our fingers for a future Binsearch engine.

When searching for binaries you have a number of options.  You can simply search by subject or add details like min/max file size, max age and whether to hide images or files.  Once you find what you’re looking for Mimo will take care of the download, repair and extraction of the files.

In addition to the Usenet search indexes you can also choose to “Find a Group” and search for newsgroups by topic.  For example if your interested in Corvettes you can search for the term “Corvette” and find the alt.autos.corvette group.  Then easily add it to your favorite groups.

2. Automated RAR assembly

We get questions from new Usenet users all the time asking what to do with the RAR files they download.  It can be difficult getting started with newsgroups if you don’t know the ropes.  Two of which are RAR and PAR files.  Using Mimo you don’t have to worry about what to do with the Rar’s because the newsreader will automatically assemble them for you.  Without the need for WinRAR or another third party application.

3. PAR2 recovery as needed

Assembling the Rar’s is only half the story.  At times you will need to repair the Rar archive with the use of PAR files.  Normally you would need a third party application like QuickPar.  With Mimo all you need are the Par’s which are typically included in large file sets.  If necessary Mimo will repair your download and extract it to the destination folder without your interaction.  Very cool!

It appears that Mimo downloads the full file set including all the PAR files and then uses them for repairing as needed.  Which is fine.  A cool future enhancement would be to only download the smallest Par to check and then just enough Par’s for the repair.  Since Giganews completion is very high you’ll find that many times you won’t need the Par’s at all.  When you do though they are a life saver.

4. Giganews Accelerator

Giganews Accelerator compresses header downloads.  With the GN Accelerator built into Mimo the newsreader can download headers up to 10 times faster than a normal Usenet client without the feature.  We offer a more detailed explanation of Giganews Accelerator on the main NGR site and Giganews offers a video tutorial in their Usenet University section.  Remember though the video guide walks you through setting up the Accelerator in other readers.  You will not need to do anything to use it in Mimo.

5. Image thumbnails / binary descriptions

When browsing a newsgroup you can simply click on any post that includes an image file and the image will show up below in the content pane.  A nice feature since you don’t have to open the download folder to view images.

Mimo does a very nice job of presenting information based on content type – text, image or binary for example.  Text posts are presented similar to an email which makes them easy to read.  For binaries the NFO contents will be displayed when one exists along with a list of included binary files.

6. Easily post to text groups

Let’s face it some newsreaders are just meant for binaries and don’t support text newsgroups.  Mimo isn’t one of those.  In fact if you can use popular email programs like Outlook or Thunderbird then using Mimo for text posts will be a piece of cake.

The first nice Mimo feature for text groups in threading.  Mimo will automatically thread related posts.  Clicking on any post or opening the thread will display the highlighted post in the content pane.  From there your email skills and instincts will kick in.

When viewing a text post you have options to reply to the newsgroup, reply via e-mail, forward via e-mail or block the poster.  Not than any newsgroup discussions ever get heated…

7. Filter text, binaries and images

If you subscribe to large newsgroups or look through a large set of Usenet search results then filtering is your friend.  It can really help narrow down the results and find what your looking for.  Especially considering Giganews holds around 2,700 days of text groups and well over 800 in binary groups.

Mimo has three images up at the top of the search pane, just beside the search box.  They allow you to hide messages (text posts), images (jpg, gif, etc) and files (binaries).  You can toggle each filter off or on at any time.

8. Import NZB files

Being able to import and associate NZB files with Mimo is important.  Especially if you have a favorite Usenet search engine other than Golden Frog or NZBIndex.  In our case we have a few favorites.  The folks at Golden Frog recognize that you might want to import NZB’s into Mimo.  Once you download the NZB file from any site simply double click it if you set the association during setup or click File – Open NZB File from within the browser.

9. Supports multiple SSL connections

Speed and security are always important.  We like to keep our connections capped as much as possible and know that all newsreader communication is encrypted.  Mimo makes both possible.

First for speed – Diamond customers can use up to 50 connections.  This is an area where some get confused.  By default Mimo is configured with 10 connections.  If that maxes your Internet connection then don’t increase the number.  It will only tie up more resources.  However, if you need more connections to max the speed click on Tools – Server settings and adjust the Maximum Connections until you find the right spot.

Security / privacy – all communication through Mimo is protected via 256-bit SSL encryption.  In addition as a Diamond customer you have free access to VyprVPN.  If you’ve not tried it yet you should.  It will help protect you outside of Usenet including web browsing and email.

10. Windows & Mac compatible

So many newsreaders are Windows-only.  Mimo coming out with Mac compatibility is a big win for Apple fans.  We’re slowly leaning toward Mac for web development so we appreciate the added support.  To be more specific Mimo is compatible with MAC OS X 10.6 or higher.

Stay tuned for part three of our Mimo Usenet Guide where we’ll cover tips and tricks to make your Mimo experience even more enjoyable.  If you’re not already a Giganews Diamond member sign up now and receive a 14 day free trial and 50% off your first month!

Giganews Releases Mimo Client with Usenet Search

Giganews is rolling out their new Mimo Usenet browser today.   Diamond members will have free access to the new client and Golden Frog Usenet search beta.  Other subscribers will need to upgrade to a Diamond account to gain access to Mimo.

We wrote about the Mimo technology preview back in June and will be providing more coverage on the final release in the weeks to come.

In addition to the Mimo release Giganews is revising some of their pricing plans on January 1, 2011.  Here is a summary of the changes:

Diamond accounts will increase in price by $5 to $34.99 a month and include extra connections, VPN access and the new Mimo newsreader.
Platinum accounts will include SSL encryption for the same $24.99 monthly price.  Where SSL excryption is currently a $5/mo. add-on.
Silver accounts (50 GB/mo.) will include SSL for $14.99 a month
Bronze accounts (10 GB/mo.) will include SSL for $9.99 a month
Pearl accounts (3 GB/mo.) will include SSL for $4.99 a month

It will be interesting to see the impact of the new pricing.  Those who want Usenet-only access with SSL from Giganews will save $5 a month while new Diamond members will see their memberships increase in price.  New Silver, Bronze and Pearl members will pay $2 more a month and gain SSL encrypted newsgroup access.

The new pricing will roll out on January 1st, 2011.  Current Diamond account members will continue to pay $29.99 a month while new members will pay $34.99.  If you have been considering a Giganews Diamond account we suggest you sign up by December 31st for the savings.  In addition Giganews is offering 50% off your first month.

NZB.cc Provides Relevance Based Usenet Search

We had the pleasure of testing out a new experimental Usenet search site tonight – NZB.cc.  We enjoy using several Usenet search engines.  Binsearch, NGIndex and NZBsRus just to name a few but NZB.cc does things a bit differently. NZB.cc delivers search results based on relevancy.  See for yourself:

The site bill’s itself as the “World’s fastest NZB search engine” and we have to admit it’s pretty darn fast.  Our search for Ubuntu came back in about half a second. More importantly the results were accurate and relevant to our search.

Rather than sort search results by date, NZB.cc provides the best result on top based on several relevancy factors.  These factors include size of the file collection (50 MB minimum), completion (less than 5% damaged), inclusion of PAR2 files (under the same name as the main post) and bonus points for posts that include an NFO file.  Better yet NZB.cc does not allow posts with RAR passwords.

We look forward to following the progress and growth of the site.  Read our NZB.cc review to learn more or visit https://www.nzb.cc and see for yourself.

Binsearch Reaching for 900 Days of Usenet Search

We recently noticed that our favorite Usenet search engineBinsearch.info has added some new options to their “maximum age of post” dropdown:


Increasing the maximum days you can search for binary files up to 900 days.  The binsearch homepage mentions they are currently over 800 days and reaching toward 900.  Looking closer at their retention across the newsgroups binsearch is around 803 days and growing along side Giganews.

If you haven’t tried Binsearch we highly recommend the site.  Their design is clean and very easy to use.  Simply type in your search criteria and let the engine do the rest.  Read our Binsearch.info review to learn more.

How do NZB files end up on Usenet?

Ever wonder how NZB files end up on Usenet? There are a few ways NZBs are created and we will discuss two popular scenarios.

1)  NZB created and posted with the file:   Many times when users are uploading articles to Usenet they create an NFO file and an NZB file along with the archive.  There are uploading programs available that automatically create an NZB for you during the posting process.  This is the preferred method as the NZB file will point to the entire file set including the RAR parts, NFO, Par2 files, etc.

2)  NZB search engine:  Other times, there are 3rd party services such as Usenet indexing or NZB search engines that help you create the NZB file.  These NZB Indexing sites will allow you to search for a file by subject or filename. Some NZB sites will give you many more options to search with.  Once you find the file it will be displayed as a file collection.  Once you find the articles/file collection that you are looking for there will generally be an option to create the NZB.

There are many Usenet indexing sites / Usenet search engines on the market. Some are free while others are pay for use. The fees for the pay sites are very modest ranging from a few cents a month to $10/year.  We recommend using NZB’s because of the time it saves.  Either type of nzb site make using Usenet much easier and more efficient.  For example, the NZB search engines offer a user many options to search by.  A Usenet user can search by subject/filename, minimum or maximum date of the post, the poster, size of the file, search only in specific newsgroups and much more.  Some sites even go as far as letting you filter your search by file format type, file categories, and even search for file by defining a maximum or minimum file size.

Usenet search engine / Usenet indexing services:
–  Ngindex – small fee
–  Binsearch – free
–  Newzbin – small fee
–  NZBindex – free
–  Newzleech – free

Nzb sites:
–  NZBsRUS – small fee
–  Merlin’s Portal– free
–  Nzbmatrix – small fee

To open an NZB, you must use a newreader that supports the use of NZB’s.  Most Usenet Browsers support the functionality but be sure to visit NGR or the Usenet clients site to confirm.

Merlins-Portal.net Relaunched : Welcome Back Merlin

After months of the site being down and Merlins farewell letter we were very surprised to see Merlins Portal live again.  No better way to start the Fall than to welcome back Merlin.  The newly designed merlins-portal.net launched earlier this week.


No doubt it will take some time for Merlin’s to rebuild the NZB library.  With a community in the thousands including old and new members within the first few days the site should come back quickly.

Here is the message from Merlin regarding the sites return:

Welcome back to Merlins Portal

Welcome to the old but new merlins portal, due to so much demand and arm twisting I have rebuilt the site from scratch.
If your an old member come on in and join and catch up with old friends.

Merlins Portal is the same as always, NO information restricted, NO money required to use the site. FREE is FREE in our book.
New look same ethos, same principles & morals.
In the few days we have re opened we have took in 1000’s of new/old members & 1000’s of NZB files as we rebuild or NZB library.
Good reputation is why we succeeded before and why we will again and why 1000’s use us then and now.
Hopefully see you on the other side and not just as a guest

New and old members always welcome. You will have to re register.

To learn more and join the Merlins community visit http://www.merlins-portal.net.